I have been working with several clients to create a new process for combating insider threats. This new approach we have been calling “scattersensing”. Using this technique (or a variation of it), you can cheaply, effectively and efficiently identify overt insider threats that may be occurring around your organization’s network.
Scattersensing, when done with this method, costs less than $130 per scattersensor! Here’s what you need to do one scattersensing point of security visibility:
One older laptop or desktop system with a CDRom and a network card:
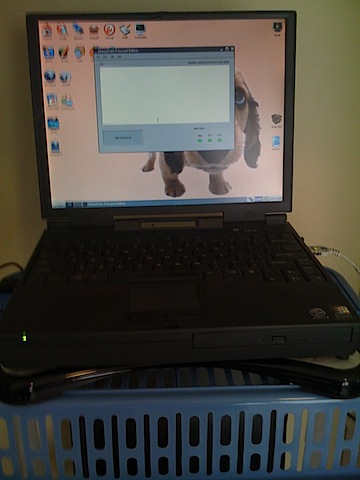
I use an old Gateway Solo like the ones found on this EBay page. None of the laptops on this page cost $100 and many are under $50. My scattersensor laptop that I use in the lab is a Pentium II 300 MHz with a small amount of RAM. The CD drive is built into the machine. The battery is long dead, but the rest of the hardware works. I bought the 100 Mbit PCMCIA card at a garage sale for $5, but they are also available on the cheap from EBay and a lot of other places. We don’t even really care about the hard disk, since we can run the entire system from a LiveCD if we need to, or if you have a working hard drive, you can do a hard disk install and make it even easier to use as you move it from place to place. You could also do this with just about any standard desktop, workstation or old PC you have laying around anywhere or can obtain at a garage sale or thrift store.
Now that you have the hardware, you need the operating system. For our approach, we suggest Puppy Linux. It has been tested to work as desired and can be easily hardened with a password change. You can read more about it and download the ISO image from here. Download it and burn it to a CD. You can then do the optional hard disk install if you like, simply follow the directions from the Puppy Linux site and/or from the included installer. (You may need to wipe the disk first if an NTFS partition is present). Cost of the operating system: FREE
Next, we need a copy of HoneyPoint Personal Edition from MicroSolved. You can get the zip file from here for Linux. To have the application run longer than 15 minutes at a time, you need to purchase a license for $29.95 from the online store here. Digital River will send you a license key via email. Use that license key when you first start HPPE and it will unlock the application for that system. You can use the license key over and over again on the same system if you are using a LiveCD (so keep it handy) or it will be maintained by HPPE if you did a hard disk install. Now, install, start, configure and license HPPE on your scattersensor.
Here is a picture of a scattersensor I use routinely in the lab and in the field for training/exercises. It is the Gateway Solo I referred to above.

OK, so now that you have a scattersensor built, what next? Next you deploy it. You place it in your network environment, using it to detect overt insider threats like scanning, malware probes, bot-net activity and anyone looking around the environment. Since the services that are being offered by the HPPE deployment aren’t real, there is absolutely NO REASON you should see any activity at all. Any activity you do see, should be treated as suspicious at best and malicious at worst. Investigate any activity you see, period. Many organizations find things like misconfigured software, holes in ACL’s or the like and of course, the variety of attacks previously described.
Using scattersensor(s), you can easily move them from network segment to network segment on a semi-random schedule. Move them to the DMZ for a week or so, then on to the server network segment, then to a partner network, then to workstation segments. Build more than one and cover a lot of areas easily. For small to mid-size organizations, a couple of scattersensors with HPPE may be more than enough to give you good security visibility and coverage. Many organizations have used the scattersensing approach for a while and then moved up to use the full blown HoneyPoint Security Server enterprise product.
There you go, a first light touch on the subject from Operation Anaconda. A way to easily (and incredibly cheaply!) get security visibility in a powerful and evolutionary way. Give it a try and let us know how you fair. You can report your updates and progress in the comments or via the #anaconda hash tag on Twitter. Good luck out there!
