Risk Assessment Techniques for Everyone

Risk assessment and treatment is something we all do, consciously or unconsciously, every day. For example, when you look out the window in the morning before you leave for work, see the sky is gray and decide to take your umbrella with you, you have just assessed and treated the risk of getting wet in the rain. In effect, you have identified a threat (rain) and a vulnerability (you are subject to getting wet), you have analyzed the possibility of occurrence (likely) and the impact of threat realization (having to sit soggy at your desk), and you have decided to treat that risk (taking your umbrella) – risk assessment & treatment.

However, this kind of risk assessment is what is called “ad hoc”. All of the analysis and decision making you just made was informal and done on the fly. Pertinent information wasn’t gathered and factored in, other consequences such as the bother of carrying the umbrella around wasn’t properly considered, other treatment options weren’t considered, etc. What business concerns and government agencies have learned from long experience is that if you investigate, write down and consider such factors rationally and holistically, you end up with a more realistic idea of what you are really letting yourself in for, and therefore you are making better risk decisions – formal risk assessment.

So why not apply this more formal risk assessment technique to important matters in your own life such as securing your home? It’s not really difficult, but you do have to know how to go about it. Here are the steps:

  1. System characterization: For home security, the system you are considering is your house, its contents, the people who live there, the activities that take place there, etc. Although, you know these things intimately it never hurts to write them down. Something about viewing information on the written page helps clarify it in our minds.
  2. Threat identification: In this step you imagine all the things that could threaten the security of your home and family. These would be such things as fire, bad weather, intruders, broken pipes, etc. For this (and other steps in the process), you can go beyond your own experience and see what threats other people have identified (i.e. google inquiries, insurance publications).
  3. Vulnerability identification: This is where you pair up the threats you have just identified with weaknesses in your home and its use. For example, perhaps your house is located on low ground that is subject to flooding, or you live in a neighborhood where burglaries may occur, or you have old ungrounded electrical wiring that may short and cause a fire. These are all vulnerabilities.
  4. Controls analysis: Controls analysis is simply listing the security mechanisms you already have in place. For example, security controls used around your home would be such things as locks on the doors and windows, alarm systems, motion-detecting lighting, etc.
  5. Likelihood determination: In this step you decide how likely it is that the threat/vulnerability will actually occur. There are really two ways you can make this determination. One is to make your best guess based on knowledge and experience (qualitative judgement). The second is to do some research and calculation and try to come up with actual percentage numbers (quantitative judgement). For home purposes I definitely recommend qualitative judgement. You can simply rate the likelihood of occurrence as high, medium or low risk.
  6. Impact analysis: In this step you decide what the consequences of threat/vulnerability realization will be. As with likelihood determination, this can be judged quantitatively or qualitatively, but for home purposes I recommend looking at worst-case scenarios. For example, if someone broke into your home, it could result in something as low impact as minor theft or vandalism, or it could result in very high impact such as serious injury or death. You should keep these more dire extremes in mind when you decide how you are going to treat the risks you find.
  7. Risk determination: Risk is determined by factoring in how likely threat/vulnerability realizations is with the magnitude of the impact that could occur and the effectiveness of the controls you already have in place. For example you could rate the possibility of home invasion occurring as low, and the impact of the occurrence as high. This would make your initial risk rating a medium. Then you factor in the fact that you have an alarm system and un-pickable door locks in place, which would lower your final risk rating to low. That final rating is known as residual risk.
  8. Risk treatment: That’s it! Once you have determined the level of residual risk, it is time to decide how to proceed from there. Is the risk of home invasion low enough that you think you don’t need to apply any other controls? That is called accepting risk. Is the risk high enough that you feel you need to add more security controls to bring it down? That is called risk limitation or remediation. Do you think that the overall risk of home invasion is just so great that you have to move away? That is called risk avoidance. Do you not want to treat the risk yourself at all, and so you get extra insurance and hire a security company? That is called risk transference.

So, next time you have to make a serious decision in your life such as changing jobs or buying a new house, why not apply the risk assessment process? It will allow you to make a more rational and informed decision, and you will have the comfort of knowing you did your best in making the decision.

HoneyPoint Security Server Console 4.1 Released

MSI is proud to announce the immediate availability of the HoneyPoint Console version 4.1!

The new version of the Console for HPSS is now available for Windows, Linux and Mac OS X.

The new Console includes the ability to bypass local event logging and instead send the events directly to syslog or to be processed by the plugins. This allows the Console to work with a SIEM, other monitoring tools, or any centralized log management system without worrying about managing the local event database. Several improvements in the GUI console have been made, the ability to test email servers has been added, and multiple bugs have been addressed.

To obtain the new Console files or installer, refer to your QuickStart Guide on how to access the HoneyPoint Security Server distribution site. No changes to the database or license key are required, however, you must have a current license to qualify for the upgrade. An in place upgrade can be performed or the installer can handle the upgrade on Windows. As always, we recommend backing up the database and any plugins and logs before upgrading.

Thanks, as always, for choosing HoneyPoint Security Server and MSI. We value your partnership and trust.

HPSS and Splunk

We’ve had a few users ask how to feed alerts from the HPSS Console into a SIEM. In these cases it was Splunk, so I will show how to quickly get a feed going into Splunk and some basic visualizations. I chose Splunk since that’s what I helped the users with, but any SIEM that will take syslog will work.

The first step is to get the HPSS Console set up to externally log events. This can be enabled by checking the “Enable System Logging” in the preferences window. What happens with the output depends on your OS. On Windows the events are written to Event Log, and on Linux/MacOS they are handled by the syslog daemon. Alternatively you can use the Console plugins system if syslog/eventlog is not flexible enough.

HPSS Preferences Window

Before we go further, we’ll need to configure Splunk to read in the data, or even set up Splunk if you don’t have an existing system. For this blog post, I used the Splunk Docker image to get it up and running a couple minutes in a container.

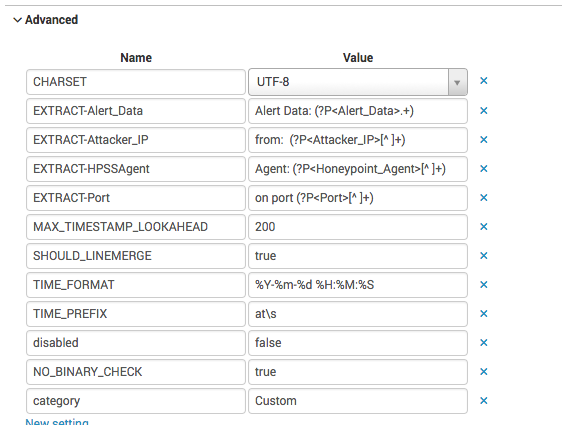
In Splunk we’ll need to create a “source type”, an “index” and a “data input” to move the data into the index. To create the source type, I put the following definitions in the local props.conf file located in $SPLUNK_HOME/etc/system/local (you may need to create the props.conf file)

[hpss]
EXTRACT-HPSSAgent = Agent: (?P<Honeypoint_Agent>[^ ]+)
EXTRACT-Attacker_IP = from: (?P<Attacker_IP>[^ ]+)
EXTRACT-Port = on port (?P<Port>[^ ]+)
EXTRACT-Alert_Data = Alert Data: (?P<Alert_Data>.+)
TIME_PREFIX = at\s
MAX_TIMESTAMP_LOOKAHEAD = 200
TIME_FORMAT = %Y-%m-%d %H:%M:%S

This tells Splunk how to extract the data from the event. You can also define this in the Splunk web interface by going to Settings -> Source Types and creating a new source type.

Source Type definition

Next create the Index under Settings -> Indexes. Just giving the index a name and leaving everything default will work fine to get started. 

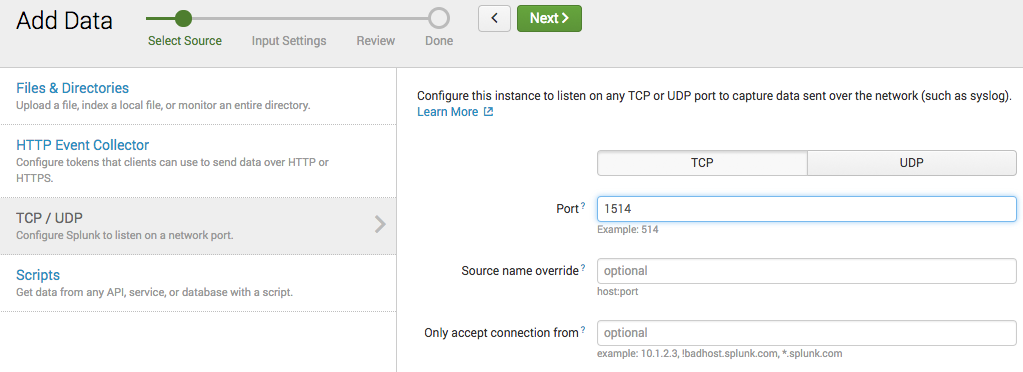
To create a Data Input, go to Settings -> Data Inputs.  I’m going to set it up to directly ingest the data through a TCP socket, but if you already have a setup to read files from a centralized logging system, then feel free to use that instead.

 Set the port and protocol to whatever you would like.

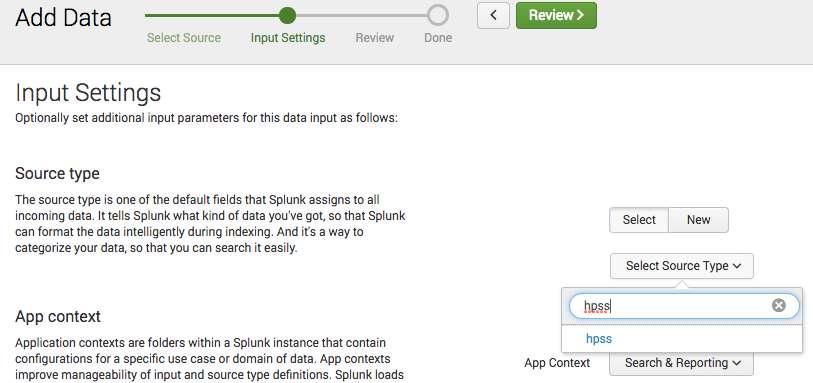
For the source type, manually typing in “hpss” (or whatever you named it) should bring up the already defined source type. Select that, and everything else can remain as is. Then go to review and finish. It’s now ready for you to ship the events to it.

Lastly, we need to get the logs from the Console system to Splunk. Again, this will differ depending on your OS. I will show one way to do this on Windows and one for Linux. However, there are numerous ways to do it. In both cases, replace the IP and Port of your Splunk instance.

On Windows you can use NXLog or another type of eventlog to syslog shipper. After installing NXLog, edit the following into the configuration file.

define ROOT C:\Program Files\nxlog
#define ROOT C:\Program Files (x86)\nxlog

Moduledir %ROOT%\modules
CacheDir %ROOT%\data
Pidfile %ROOT%\data\nxlog.pid
SpoolDir %ROOT%\data
LogFile %ROOT%\data\nxlog.log

<Input in>
Module im_msvistalog
Query <QueryList>\
<Query Id="0">\
<Select Path="HPConsole">*</Select>\
</Query>\
</QueryList>
SavePos TRUE

</Input>

<Output out>
Module om_udp
Host 192.168.232.6
Port 1514
</Output>

<Route 1>
Path in => out
</Route>

On Linux with rsyslog, create a conf file with the following

:msg,contains,"HPSS Agent" @@192.168.232.6:1514

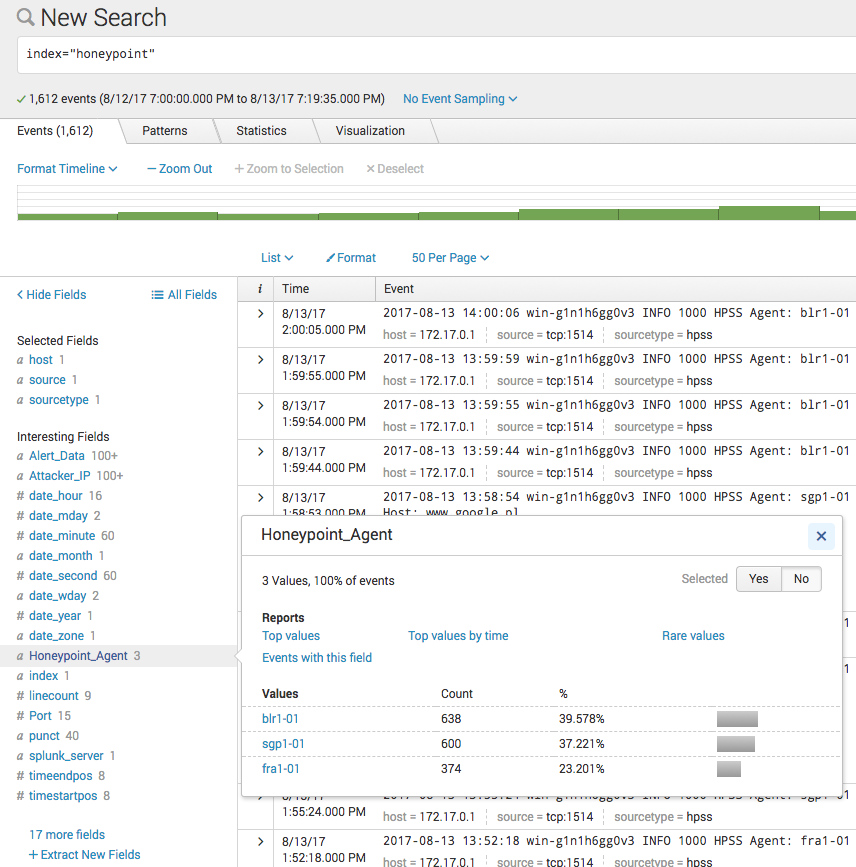
Now Splunk should be receiving any HPSS events sent to it and storing them in the defined index, and extracting the fields during search queries.

In the future we can look at creating some graphs and analyze the events received. If there is any interest, I can look at creating a Splunk app to configure all of this for you.

Have ISP-provided WiFi but don’t think you use it? You could be wrong – and on the open Internet

As with many home networks, you may have an all-in-one cable modem/router/wireless access point provided by the ISP, as well as your own personal router/wireless access point. To prevent a double NAT issue, the ISP router is bridged and the personal router is performing NAT and firewall functions. This setup for a friend’s home network is diagrammed as below:

All wireless devices connect to the Personal-WIFi SSID, with the wireless key saved for automatic reconnection to this access point, and behind the router’s firewall. The ISP-Modem-WiFi SSID was not disabled for the occasional connectivity and bandwidth test. However, whenever he switches to the ISP-Modem-WiFi SSID, he manually enters the wireless key and none of his wireless devices has this wireless key saved. Or so he thought.

About a month ago, he had set his laptop down close to the ISP’s modem in the basement. The laptop was on but was not being used. Later that day, he got on the laptop and noticed he couldn’t connect to any internal sources in his home network but there was internet connectivity. He moved the laptop to the den, and was then able to connect to his media server and file shares. He didn’t think anything of it.

The next day, he discovered for several hours in the previous day, the laptop had had many connection attempts from the internet, several over ftp, telnet, mssql ports. This was alarming because the attempts were coming from the public internet – how were these attempts going through the firewall?

On the laptop runs a HoneyPoint agent – MicroSolved’s proprietary honey pot application – that listens for and responds to connection attempts to specific ports. The agent will then send an alert to the HoneyPoint console for report, alerts or analyses. The laptop HoneyPoint agent had detected these connection attempts. No real service connections were established; no actual breaches occurred. The HoneyPoint agent records the source IP, port being probed, and what data was sent. The attacks indicated discovery probing with a vector towards IoT devices.

But the lingering question was, how could the connection attempts go past the firewall?

It was only serendipitous that he stumbled on the answer. About a week ago, he couldn’t RDP to a Windows box in his internal network, but still had internet. Turns out, the home wifi (Personal-WIFi SSID) was having a hiccup but the laptop had automatically switched to the ISP-Modem-WiFi SSID – outside the firewall. He had inadvertently saved the wireless key to this SSID and was not aware of it. The laptop was now bridged and getting an IP from the ISP, with no firewall or router in between. Also, almost immediately, he noticed the HoneyPoint alerts – connection attempts on the same ftp, telnet, mssql ports were coming in from the public internet.

Lesson learned = if you’re going to keep your wireless access point enabled without a firewall – as in the bridged ISP modem/router – then DO NOT save the wireless key for it on any of your devices (either intentionally or accidentally) or you may be connecting to it without being aware. Best is to disable the wireless, but if you need it, set a strong WPA2 password and do not save the key on any device.

Another lesson learned = In the ensuing troubleshoots, he discovered the router’s uPnP setting had been left enabled, its default setting. That was immediately disabled. Additionally, HoneyPoint agent is a light-on-resources, quick-alerting IDS that does its intended job.

Note of explanation: One could argue the point to bridge the personal router instead of the ISP modem/router, and you would not have this issue. However, if you have many DHCP reservations in your internal network and have ever changed ISP’s, you understand the pain of re-entering those client reservations on a new modem/router. With this setup, you can easily switch ISP’s, slide in a new modem/router and bridge it, and all internal network resources are not interrupted.

Resources: Is UPnP a Security Risk?; Disable This Buggy Feature…